|
|
|
|
|
|
Want more
details?
|
|||||
|
ProjectLINKS:
|
|||||
|
|||||
| 2004-05-24 11:00am | ||||
|
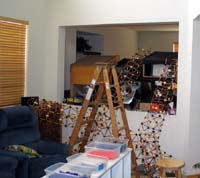
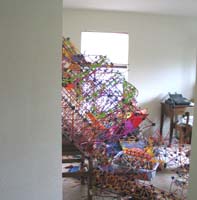
Here's the pictures of the wreckage and all the bins.
|
||||
| 2004-05-24 9:00am | ||||
|
Charles is gone! The leg thing didn't work. I ran out of gray rods while building them and decided to substitute double-yellow rods. But to do that I had to add more reinforcement to it, and used double-purple connectors. I thought it would be ok since the legs would be under compression and the purple connectors wouldn't get a chance to separate. I was wrong! As I started taking a section off, the leg would stretch out and come to the floor. Patricia suggested sticking books under the leg so I could lower it more slowly. I did that with all the legs and then started removing books from one of them. The leg suddenly exploded and Charles was sitting on only 3 legs! Fortunately I had strapped it at the top just-in-case! Patricia and I talked and decided the next best thing was to just go up to the top and grab on and pull it into the loft. It was a challenge but it came up (scraping the wall at the edge). After two days of disassembly and sorting, it's gone. And our fingers are sore. I'll put up pictures of the wreckage soon. |
||||
| 2004-05-19 10:00pm | ||||
|
|
||||
| 2004-05-14 9:00am | ||||
|
Messed with AdvanceCD and made a custom build that boots from CD and plays my favorite games. The menu and AdvanceMAME are now pre-configured to match the layout of my keyboard hack K'nex controller. There was a bug in the rc.S script that would check for the advmenu.rc but instead try to copy advmess.rc. I had to get the source part and extract the initrd to fix it. It's now ready to go so we won't have to spend a lot of time getting MAME running on whatever computer Dave is planning to use and can instead focus on building the cabinet.
|
||||
| 2004-05-11 5:00pm | ||||
|
I fiddled around for a while last night to try to find a way to make K'nex hold a microswitch. I gave up and decided to use a pre-made microswitch holder: an arcade button. So then I had figure out how to make K'nex hold an arcade button. Turns out that by arranging 4 old-style coaster track connectors they'll make a nice 1 1/8" hole! Now I have 6 buttons across the front of the control panel for the extra functions like ESC, Tab, and coining up. (I didn't need these buttons on my old prototype since I used an I-PAC and it has a "shift" function.)
|
||||
| 2004-05-10 2:00pm | ||||
|
Unfortunately the keyboard I wanted to use doesn't seem like it's going to work. I started shorting together a few keys, and after getting 6 down, it seemed to block any more. So I went through my pile of keyboards to see what else I might have. Turns out I have the exact same model listed in the Keyboard Hack document! (It was another freebie keyboard donated to Full System.) I had no idea! It uses an 18x9 matrix instead of a 17x8, but I should be able to add one more copper strip to the side of each cardboard finger board.
|
||||
| 2004-05-09 11:00am | ||||
|
Gear up for Buildfest V has begun! No date has been scheduled yet, but we have a plan for what we're going to build: An arcade cabinet! Some of our team has some doubts about whether a cabinet made of K'nex is going to be able to withstand the punishment of insane game playing action, but I think if people control themselves it'll work great! It's been a while since we've done anything and Charles is still hanging on my wall. I'm not exactly looking forward to taking it down, partly because the space will look empty, but mainly because my fingers are soft again and it's going to hurt. Not to mention it's going to involve a lot of disassembly and sorting. I actually got the idea for this around May of 2003, after considering building a MAME cabinet (or two) for the lobby at Full System, Inc. At that time I had only downloaded and played on my computer for a bit, and had *no* arcade parts at all. I was thinking of possible doing a keyboard hack and not sure what I would use for joysticks and buttons. A lot has changed since then. I've built 3 MAME cabinets myself, and assisted on a 4th. "Green leader" Dave and his wife Stacey have also recently moved and they now have a game room. Since they don't have an arcade cabinet yet, what better way to christen the new house than with a Buildfest? The arcade parts from this are mostly freebies and recycled. The joysticks and buttons I plan to use came from a heavily water damaged cabinet. I scavenged everything I could. I spent a lot of time desoldering the wires off the switches so I can use quick disconnects, cleaning and rebuilding parts, and testing the leftovers to make sure they still work. The buttons were all disassembled and the plastic parts run through the dishwasher. The joysticks were taken apart and cleaned, the shafts were painted silver to cover up all the rust, and reassembled with new screws. The plywood the parts are mounted to was the prototype I used on my own cabinet. No sense throwing out a perfectly good board! The contact paper even comes from scraps I saved when I lined all my cupboards when I moved into my house. The trackball plate is being borrowed, and the trackball itself was another freebie I got from a fellow arcade collector (Thanks Patrick Mettes!). I hooked up the trackball with a mouse hack which works great. I stuck on a molex connector so the trackball itself is stock.
The keyboard was a freebie PS/2 Compaq Multimedia/Internet keyboard that was "donated" to Full System. It was once a white keyboard, but it was black from all the dirt on it. The mylar matrix was also burned inside and of no use. I took out the cable and the PCB, and tossed the rest of the keyboard. I know, I know, every site says not to use a keyboard hack and to buy one of the keyboard encoders. But what can I say, at the moment I'm dirt poor and every penny counts for paying bills (only working half-time) and have more time than money. Plus I used I-PACs on the first 4 cabinets, time to try something different! I spent about an hour last night hacking up a program that would actually record each key in a matrix on screen as I shorted each row and column together one at a time. As I would "push" a key, it would record it and move to the next row automatically. If I accidentally shorted an already tried key together the program would detect this and not add it as a newly recorded key. I can also click with the mouse to tell it where to start recording from in case I need to skip cells or go back and reenter a key. Worked great! I looked and looked and couldn't find anything like this for Windoze, but being an OpenStep/MacOS X programmer I ended up writing this for OpenStep since it runs on PC hardware. I'll probably make the source code available at some point. (If I haven't yet and you want it, just email me.) Now that I've generated a matrix, I still don't know how many keys I can push at once on the keyboard. I decided that desoldering the connectors on the board was too much work since I'm still not sure I can use this keyboard. Instead I'm hacking up a "fingerboard" out of aluminum foil, cardboard, and an old floppy cable. Yes that may sound crazy, but to me it seems easier than desoldering!
|
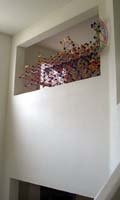
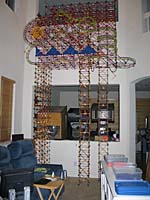 Charles
has been prepared for descent. With assistance from Patricia, I
built 4 towers as legs for Charles so I can unhook it from the wall.
Our fingers are already sore and there's still lots of disassembly
to do! There's not enough people here to take it down the same way
it was put up, and I don't have tall enough ladders to disassemble
it in place. The plan is to shorten the legs one section at a time
to lower it down gradually. Hopefully it won't tip over and smash
on the floor. I'll definitely be packing any of the breakable stuff
away though, just in case...
Charles
has been prepared for descent. With assistance from Patricia, I
built 4 towers as legs for Charles so I can unhook it from the wall.
Our fingers are already sore and there's still lots of disassembly
to do! There's not enough people here to take it down the same way
it was put up, and I don't have tall enough ladders to disassemble
it in place. The plan is to shorten the legs one section at a time
to lower it down gradually. Hopefully it won't tip over and smash
on the floor. I'll definitely be packing any of the breakable stuff
away though, just in case...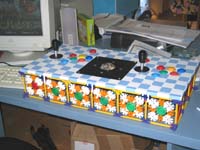 Wow!
What a lot of work that was! I just spent several hours getting
the control panel all wired up to the keyboard controller. I don't
remember it taking that long when I used the I-PAC. It could be
because it's a lot more straightforward, or maybe because those
times I just didn't pay attention to the clock. Dunno. A couple
of things weren't wired quite right, and after a quick fix, the
control panel works!
Wow!
What a lot of work that was! I just spent several hours getting
the control panel all wired up to the keyboard controller. I don't
remember it taking that long when I used the I-PAC. It could be
because it's a lot more straightforward, or maybe because those
times I just didn't pay attention to the clock. Dunno. A couple
of things weren't wired quite right, and after a quick fix, the
control panel works!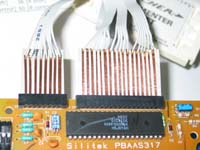 Well,
soldering to aluminum didn't work. I did a quick look on the internet
to see if I could get copper foil tape at a hardware store, and
sure enough, I can! They sell it for use as a snail/slug repellent
that you stick around your pots and they won't crawl over it. It
was a little pricey so I looked around the rest of the store to
see if there were any other options. There weren't, sure glad I
found that site on the internet otherwise I never would have checked
the gardening section!
Well,
soldering to aluminum didn't work. I did a quick look on the internet
to see if I could get copper foil tape at a hardware store, and
sure enough, I can! They sell it for use as a snail/slug repellent
that you stick around your pots and they won't crawl over it. It
was a little pricey so I looked around the rest of the store to
see if there were any other options. There weren't, sure glad I
found that site on the internet otherwise I never would have checked
the gardening section! The
black rings on the joysticks to hide the holes they poke through
were made from DVD cases generously provided by AOL. I cut the rings
out on my Insane Circle Cutting Jig. (KIDS DON'T TRY THIS AT
HOME!)
The
black rings on the joysticks to hide the holes they poke through
were made from DVD cases generously provided by AOL. I cut the rings
out on my Insane Circle Cutting Jig. (KIDS DON'T TRY THIS AT
HOME!)